• Skip to primary navigation
  • Skip to main content
  • Skip to primary sidebar
    • Facebook
    • Instagram
    • Pinterest
    • Twitter
    • YouTube
  • About
  • Cookbooks
  • Shop

Chili Pepper Madness logo

  • Recipe Index
  • RECIPES BY TYPE
    • BBQ/Grilled
    • Burgers
    • Chicken Wings
    • Chili
    • Curry
    • Dehydrator
    • Game Day
    • Hot Sauces
    • Jalapeno Poppers
    • Marinades
    • Pickling
    • Preserving
    • Quick and Easy
    • Salsas
    • Sauces
    • Seasonings
    • Stuffed Peppers
    • Tacos
  • COOKING TIPS
  • Pepper Info
    • Chili Pepper Types
    • The Scoville Scale
    • Hottest Peppers in the World
    • Growing Chili Peppers
    • Preserving
    • Health Benefits
    • Frequently Asked Questions
    • Buy Plants & Seeds
menu icon
go to homepage
search icon
Homepage link
  • Recipe Index
  • All Recipes
  • Pepper Info
  • Chili Pepper Types
  • The Scoville Scale
  • Growing Chili Peppers
  • Preserving
  • Chili Pepper Health Benefits
  • Frequently Asked Questions
  • Cooking Tips
  • Cookbooks
  • Shop
  • About Us
×

Home » Recipes » Kimchi Recipe (How to Make Kimchi)

Kimchi Recipe (How to Make Kimchi)

by Mike Hultquist · Jan 3, 2022 · 12 Comments

Jump to Recipe
Kimchi Recipe

Learn how to make kimchi at home with this kimchi recipe, including ingredients swaps and variations so you can make it your own way. I make mine with an easy wet brine and lots of extra spices.

Kimchi Recipe - How to Make Kimchi

How to Make Kimchi (Kimchi Recipe)

We're making Homemade Kimchi in the Chili Pepper Madness kitchen today, my friends. If you're spicy food lover, I'm certain that kimchi is already on your radar.

Kimchi is a Korean dish of spicy fermented vegetables, and extremely significant to Korean cuisine. It is consumed in many ways throughout Korea, tossed into fried rice dishes, ramen type dishes, served up as the star of the meal or nibbled on as a simple, healthy snack.

Napa cabbage is more commonly used, though it can be made with many other vegetables. The process involves fermentation, which is the break down of foods by lactic acid bacteria in a salt brine.

The result is healthier, well preserved food with more vitamins and a characteristic funk factor.

This particular version is the more popular Baechu Kimchi, or Napa Cabbage Kimchi, and we love it. It's definitely a spicy kimchi, as I include some extra spice, as well as extra umami because we just love it that way.

I also use a wet brine method, as opposed to a dry brine method, because it is easier to do and more fool-proof. Some people prefer the dry brine method, which is totally fine, but I always get great results this way.

Let's talk about how to make kimchi, shall we?

Mike holding 2 jars of spicy homemade kimchi

Kimchi Ingredients (What You Need to Make Kimchi)

  • FOR THE CABBAGE BRINE
  • Unchlorinated Water. For brining the cabbage. Filtered or bottled water are good.
  • Salt. Kosher salt or sea salt.
  • Napa Cabbage. Use 1 large head, about 3 pounds.
  • TO MAKE THE KIMCHI
  • Extra Vegetables and Fruit. Carrots, scallions or green onions, daikon radish or turnip, fresh garlic and ginger. Also, an Asian pear for sugar/sweet.
  • Glutinous Rice Flour. This not only helps the spicy kimchi sauce stick to the cabbage and vegetables, but also provides some sugars for fermenting.
  • Gochugaru. Gochugaru is a coarsely ground Korean chili powder, or red pepper flakes, that add lots of flavor and spice to your kimchi. It is best to use authentic gochugaru, not a substitute.
  • Umami. I use fish sauce and salted shrimp (saeujeot) and miso paste. As an alternative, use shrimp paste, or chopped dried shrimp, soy sauce, or other umami ingredients. See the recipe notes below.

How to Make Kimchi - the Recipe Method

BRINE THE CABBAGE

Make the Brine. Whisk together the unchlorinated cold water and sprinkle salt in a large bowl. 

Cut the napa cabbage into quarters

Slice the Cabbage. Slice off the root end of the cabbage. Slice the cabbage into quarters and submerge them in the brine. Use a plate or other small weights to keep the cabbage completely submerged.

Rinse and brine the cabbage to ferment

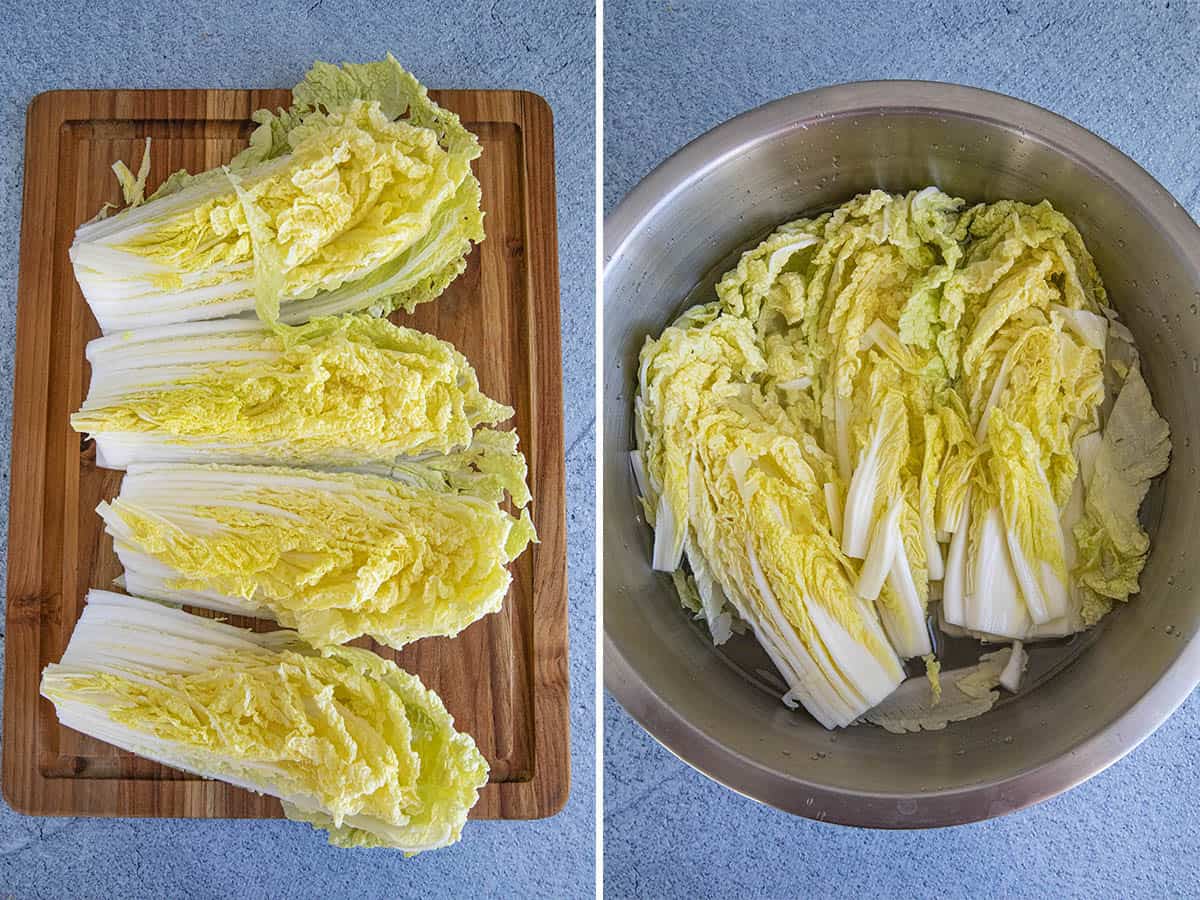
Brine the Cabbage. Set aside for 8-12 hours at room temperature.

Rinse and Chop the Cabbage. Set the cabbage into a colander and drain the brine. Rinse the cabbage and squeeze out excess water using your hands. Chop the cabbage into 1 inch pieces (if desired, or leave the pieces whole).

PREP THE VEGETABLES

Other vegetables in a bowl to make kimchi

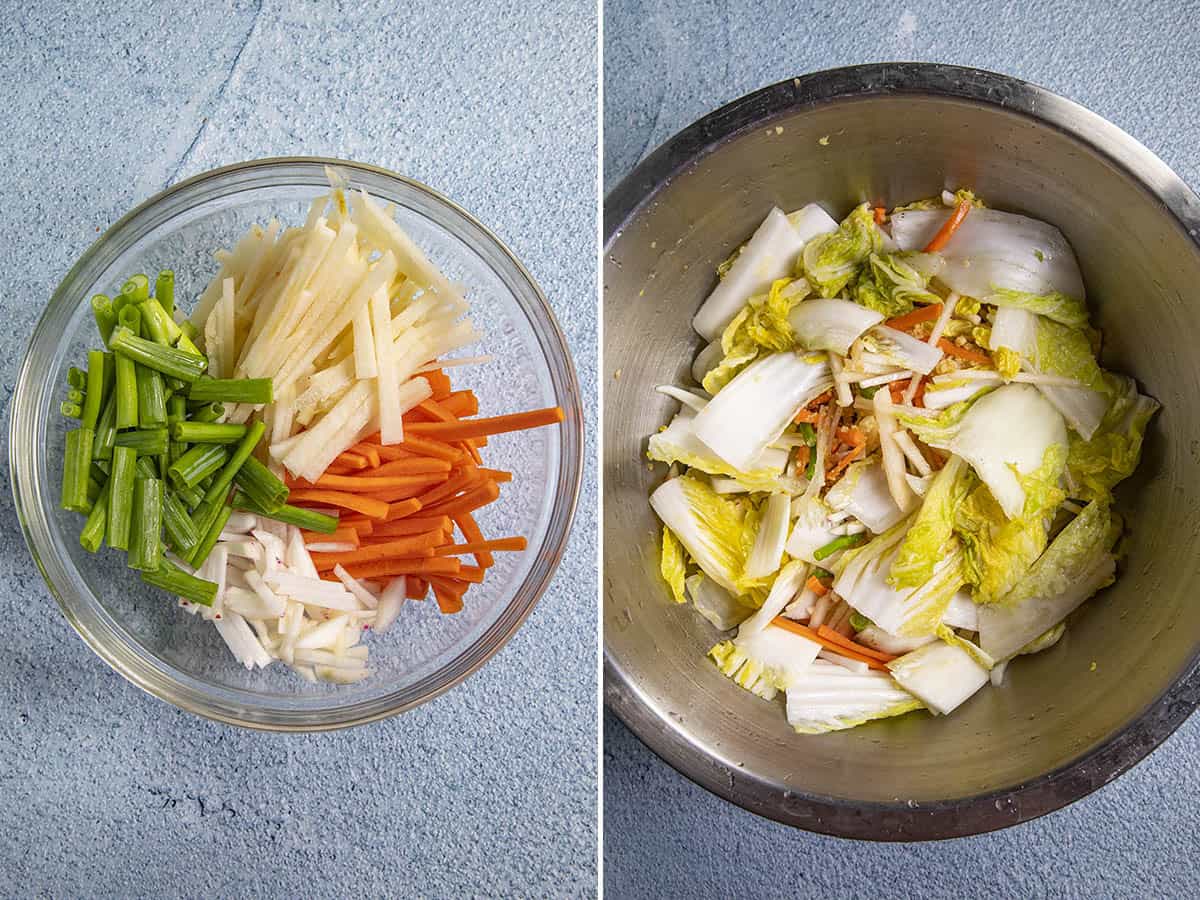
Slice and Combine the Vegetables. Slice the the carrot, scallions, radish or turnip, and Asian pear into thin slices or matchsticks. Chop the garlic and ginger.

Add them all to a large bowl along with the chopped cabbage. Toss to combine.

Chopped cabbage and vegetables in a large bowl for making kimchi

MAKE THE KIMCHI SAUCE

Glutinous Rice Flower. Add the rice flour and 1 cup water to a sauce pan. Heat to a simmer, then whisk for 3-4 minutes until smooth and the mixture forms a smooth, loose paste.

Making the glutinous rice slurry

Korean Chili Flakes (Gochugaru). Remove from heat and stir in the gochugaru. The chili flakes will bloom as the mixture cools.

Mixing the flavorful kimchi sauce

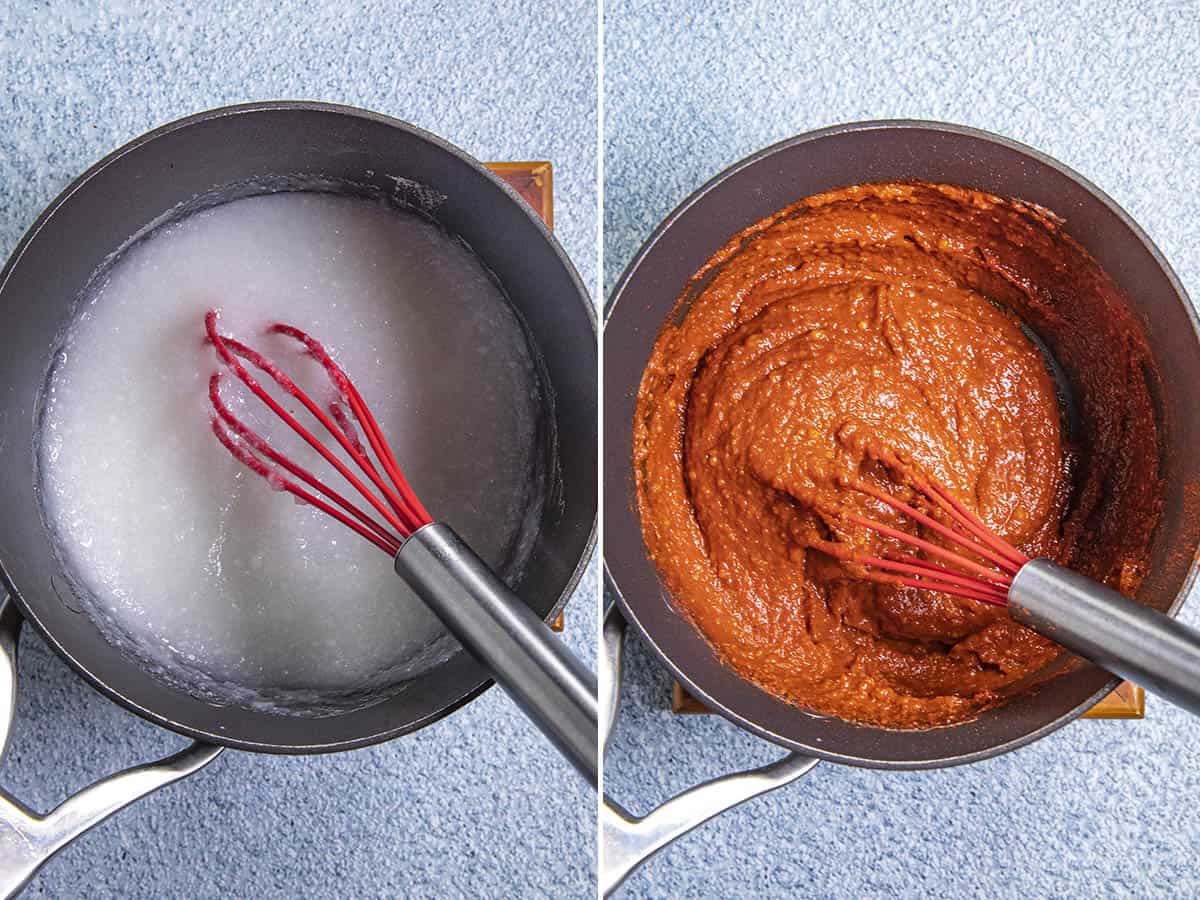
Add the Umami. Stir in the fish sauce, salted shrimp, and miso paste (or your other umami alternatives).

MAKE THE KIMCHI

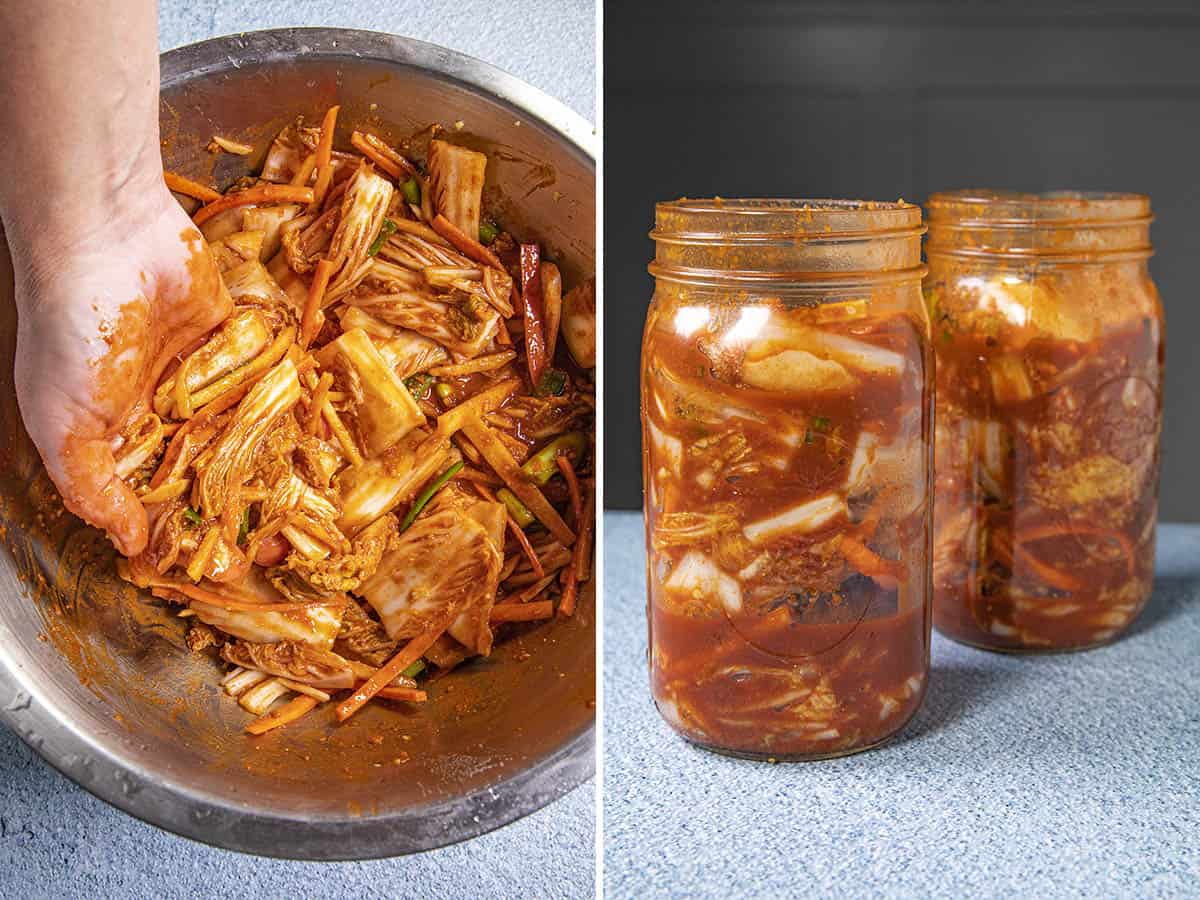
Mix with the Cabbage and Vegetables. Pour the mixture into the cabbage leaves and vegetables. With your hands, rub the gochugaru mixture into the vegetables, covering them as completely as possible. Be thorough.

Really get in there with your hands!

Mike mixing the kimchi sauce into the napa cabbage and other ingredients

Taste and Adjust. Taste and adjust for salt or any other desired seasonings. Need more chili flakes? More fish sauce? Go for it!
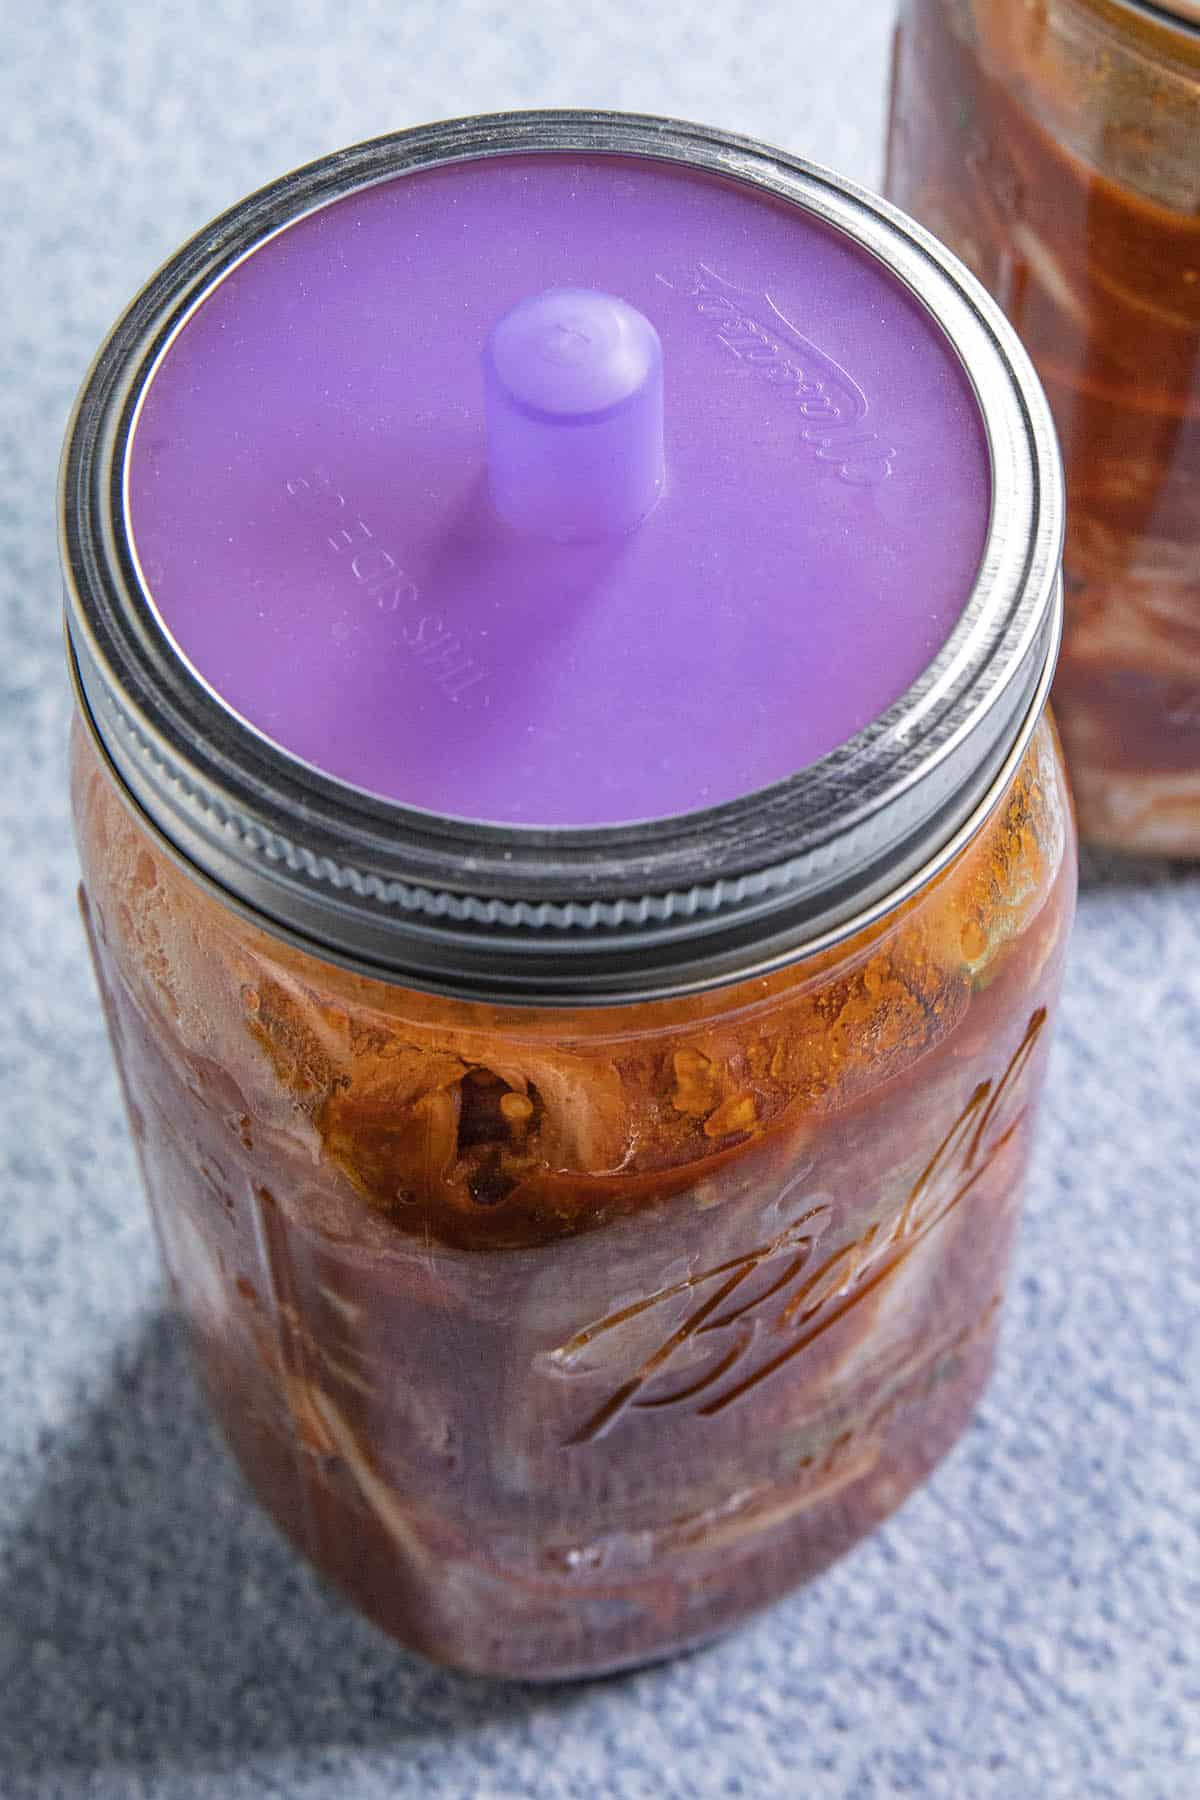
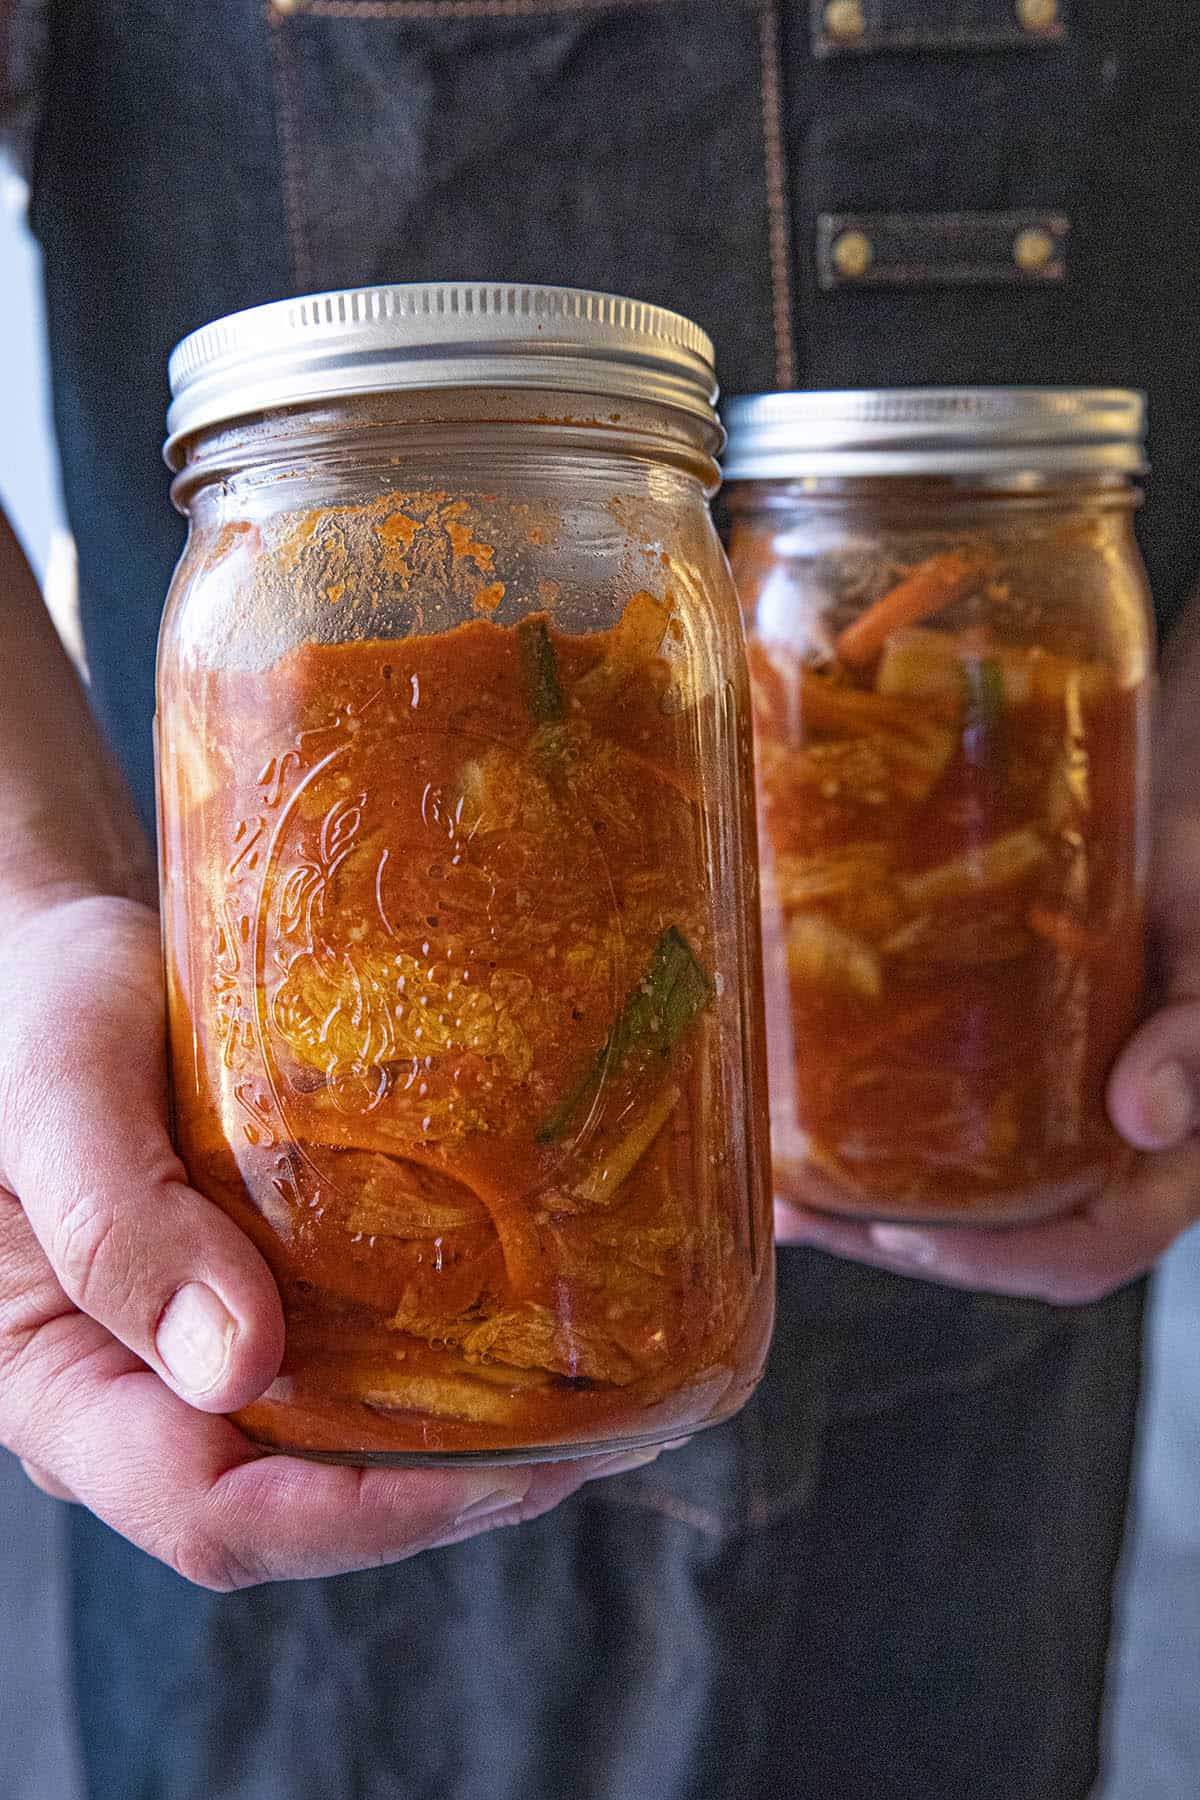
Pack the Kimchi into Jars. Pack the kimchi into a large mason jar (or several). You can use other vessels, like a fermentation crock. Press the contents down and weigh it down with glass fermentation weights (or use a plastic bag filled with water).

Stuff the kimchi into jars to ferment

Cover the Kimchi. Cover with a fermentation airlock lid, or use fermentation membranes (see notes). If you don’t have such lid options, use a 2-piece lid, but don’t screw it down, just set it on top.

This is to allow any gases to escape while fermenting.

This is the fermenting lid I use to make kimchi and other fermented foods

Ferment the Kimchi. Set aside away from any sunlit areas and ferment for 1-3 days at room temperature (you CAN ferment longer if you’d like – see RECIPE NOTES on fermentation times).

Moisture should release from the kimchi, so press the kimchi down if needed to keep it below the liquid. Gases should escape via the fermentation membrane, or just loosen the lid to let any gas build up out.

Refrigerate the Kimchi. Set into the refrigerator and let sit for 1 week to let the flavors mingle. You can enjoy it right away, but it is better to wait.

The fermenting kimchi will continue to ferment slowly in the fridge.

Boom! Done! Your kimchi is ready to go. Super curious how you plan to use your fermented cabbage once it's ready. And how spicy you made it! This will last a good 6-8 months or longer in the refrigerator.

Kimchi in jars

Recipe Tips & Notes

Umami Swaps. More traditional kimchi recipes use salted shrimp (along with fish sauce) to achieve that wonderful umami it is known for, but it can be hard to find.

You can use other ingredients, such as extra fish sauce, shrimp paste, dried shrimp, seaweed, anchovies, dried fish, soy sauce, or miso paste. I enjoy a combo of shrimp paste, fish sauce and miso, all of which I always have on hand for other recipes.

Kimchi Sauce Swaps. Gochugaru is pretty essential, but you can use gochujang instead, which is a Korean fermented chili paste. Try it with both.

Fermentation Times. Fermentation times can vary, depending on temperatures and ingredients. You can ferment longer if you'd like, but it is best to judge by smell and flavor.

The kimchi will grow more sour as it ferments, which some people prefer. Smell and taste after a day or two, then transfer to the refrigerator where it will continue the fermentation process more slowly.

Go Beyond Cabbage Kimchi. Napa cabbage is more commonly used to make kimchi, and is what most people associate with it. However, you can make kimchi with any vegetable, such as cucumber kimchi, which is another popular version, radish kimchi or mustard greens and others.

Try it with some of your favorite vegetables, or a combination of them.

What to Make with Kimchi. You can simply serve a 1/4 cup to a 1/2 cup as a simple side dish vegetable or snack. Or, swirl it into soups and stews, particularly stir fries. 

Kimchi Fried Rice is hugely popular, and quite delicious, as is Kimchi Stew (kimchi jjigae), and Kimchi Ramen.

That's it, my friends. I hope you enjoy my kimchi recipe. Let me know if you make it. I'd love to hear how it turned out for you. Keep it spicy! Extra spicy for me, please! I love kimchi.

Spicy Kimchi in a bowl, ready to serve

Cookbook Recommendations

  • Maangchi’s Real Korean Cooking, by Maangchi with Lauren Chattman (affiliate link, my friends).
  • Fiery Ferments: 70 Stimulating Recipes for Hot Sauces, Spicy Chutneys, Kimchis with Kick and Other Blazing Fermented Condiments, by Kirsten K. Shockey and Christopher Shockey.

Recommended Products

  • Buy Gochugaru (Korean Chili Flakes) from Amazon (affiliate link, my friends!)
  • Masontop Lids (affiliate link, my friends!). I recommend these lids, which I also use for fermenting peppers and making kombucha. They make the process very easy. No need to burp the jars.
Spicy Kimchi in a bowl

Try Some of My Other Popular Recipes

  • Bulgogi Sauce
  • Bulgogi Recipe
  • Korean Fried Chicken
  • Korean Chicken
spicy Kimchi in a jar

Got any questions? Ask away! I’m happy to help. If you enjoy this recipe, I hope you’ll leave a comment with some STARS. Also, please share it on social media. Don’t forget to tag us at #ChiliPepperMadness. I’ll be sure to share! Thanks! — Mike H.

Kimchi Recipe
Print

Kimchi Recipe (How to Make Kimchi)

Learn how to make kimchi at home with this easy kimchi recipe, including ingredients swaps and variations so you can make it your own way. I make mine with an easy wet brine and lots of extra spices.
Save Recipe Saved!
Course: Main Course, Side Dish
Cuisine: Korean
Keyword: cabbage, fermented, gochugaru, gochujang
Prep Time: 30 minutes
Cook Time: 2 days
Calories: 75kcal
Author: Mike Hultquist
Servings: 16
Tap or hover to scale
5 from 5 votes
Leave a Review

Ingredients

FOR THE CABBAGE BRINE

  • 2 quarts unchlorinated water filtered or bottled water are good
  • ½ cup kosher salt or sea salt
  • 1 head about 3 pounds; 1.3kg Napa cabbage

TO MAKE THE KIMCHI

  • 1 carrot sliced into matchsticks
  • 1 bunch scallions end trimmed, cut into ½ inch pieces
  • 1 small daikon radish or turnip peeled, sliced into matchsticks
  • ½ Asian pear peeled, sliced into matchsticks
  • 6 garlic cloves chopped
  • 2 tablespoons fresh grated ginger
  • 3 tablespoons glutinous rice flour
  • 1 cup gochugaru Korean chili flakes
  • 1/2 cup fish sauce
  • 3 tablespoons salted shrimp saeujeot, minced – as an alternative, use 1.5 tablespoons shrimp paste, or 3 tablespoons chopped dried shrimp (soaked), or 2 tablespoons miso paste
  • 2 tablespoons miso paste red or white – optional, for extra umami flavor

Instructions

BRINE THE CABBAGE

  • Whisk together the unchlorinated cold water and sprinkle salt in a large bowl.
  • Slice off the root end of the cabbage. Slice the cabbage into quarters and submerge them in the brine. Use a plate or other small weights to keep the cabbage completely submerged.
  • Set aside for 8-12 hours at room temperature.
  • Set the cabbage into a colander and drain the brine. Rinse the cabbage and squeeze out excess water using your hands. Chop the cabbage into 1 inch pieces (if desired, or leave the pieces whole).

MAKE THE KIMCHI

  • Add the cabbage to a large bowl along with the carrot, scallions, radish or turnip, Asian pear, garlic and ginger. Toss to combine.
  • Add the rice flour and 1 cup water to a sauce pan. Heat to a simmer, then whisk for 3-4 minutes until smooth and the mixture forms a smooth, loose paste.
  • Remove from heat and stir in the gochugaru. The chili flakes will bloom as the mixture cools.
  • Stir in the fish sauce, salted shrimp, and miso paste (or your other umami alternatives).
  • Pour the mixture into the cabbage and vegetables. With your hands, rub the gochugaru mixture into the vegetables, covering them as completely as possible. Be thorough. Really get in there with your hands!
  • Taste and adjust for salt or any other desired seasonings.
  • Pack the kimchi into a large mason jar (or several). You can use other vessels, like a fermentation crock. Press the contents down and weigh it down with glass fermentation weights (or use a plastic bag filled with water).
  • Cover with a fermentation airlock lid, or use fermentation membranes (see notes). If you don’t have such lid options, use a 2-piece lid, but don’t screw it down, just set it on top. This is to allow any gases to escape while fermenting.
  • Set aside away from any sunlit areas and ferment for 1-3 days at room temperature (you CAN ferment longer if you’d like – see RECIPE NOTES on fermentation times). Moisture should release from the kimchi, so press the kimchi down if needed to keep it below the liquid. Gases should escape via the fermentation membrane, or just loosen the lid to let any gas build up out.
  • Set into the refrigerator and let sit for 1 week to let the flavors mingle. You can enjoy it right away, but it is better to wait. The fermenting kimchi will continue to ferment slowly in the fridge.
  • Use as desired.

Notes

Lasts 6-8 months or longer in the refrigerator.
Fermentation Times. Fermentation times can vary, depending on temperatures and ingredients. You can ferment longer if you'd like, but it is best to judge by smell and flavor. The kimchi will grow more sour as it ferments, which some people prefer. Smell and taste after a day or two, then transfer to the refrigerator where it will continue to ferment more slowly.

Nutrition Information

Calories: 75kcal   Carbohydrates: 12g   Protein: 5g   Fat: 2g   Saturated Fat: 1g   Polyunsaturated Fat: 1g   Monounsaturated Fat: 1g   Cholesterol: 32mg   Sodium: 998mg   Potassium: 416mg   Fiber: 6g   Sugar: 3g   Vitamin A: 5370IU   Vitamin C: 6mg   Calcium: 78mg   Iron: 3mg
Kimchi Recipe
Did You Enjoy This Recipe?I love hearing how you like it and how you made it your own. Leave a comment below and tag @ChiliPepperMadness on social media.

Reader Interactions

Comments

    Leave a Reply Cancel reply

    Your email address will not be published. Required fields are marked *

    Recipe Rating


  1. Nathan Yuma says

    March 04, 2023 at 6:15 pm

    5 stars
    When substituting gochujang paste for the 1 cup of gochugaru how much would you recommend?

    Reply
    • Mike Hultquist says

      March 05, 2023 at 12:53 pm

      Nathan, use a 2-3 tablespoons.

      Reply
  2. Jon Menke says

    December 26, 2022 at 6:45 pm

    5 stars
    turned out just wonderful for the 4 th time I multiple by 4 to fill 1/2 gallon jar.

    Reply
    • Mike Hultquist says

      December 26, 2022 at 11:17 pm

      Excellent! Thanks for sharing, Jon!

      Reply
  3. Nicolaj says

    January 23, 2022 at 4:31 am

    How much is 16 servings here? I don't know how to translate that into say liters or quarts (whatever you prefer).

    Reply
    • Michael Hultquist - Chili Pepper Madness says

      January 23, 2022 at 7:59 am

      You'll get at least 2 packed quarts. Enjoy.

      Reply
  4. Laura Kim says

    January 05, 2022 at 10:04 pm

    5 stars
    Sounds delicious! I have questions how is the bacteria of miso and kimchi working together? Is it OK? And also is it going to be miso flavour kimchi? I want to make it for my people who are vegan. Thanks:)

    Reply
    • Michael Hultquist - Chili Pepper Madness says

      January 05, 2022 at 10:59 pm

      Thanks, Laura. You'll get more of the gochujang flavor than miso, but overall, the flavor expression is outstanding. For me, at least! I hope it is enjoyed!

      Reply
  5. Sheldon lawrence says

    January 04, 2022 at 1:28 am

    5 stars
    do you have any comments , recipes for RELISH? IM using red onions, salt, sugar, garlic. red pepper flakes (USA) vinegar. maybe a carrot or bell pepper. it seems that relish, kimchi, chili recipes are all great. hard to choose which i like better. thoughts?
    shel lawrence

    Reply
    • Michael Hultquist - Chili Pepper Madness says

      January 04, 2022 at 6:42 am

      Shel, I have a few different recipes for relish on the site. Try this Hot Pepper Relish Recipe: https://www.chilipeppermadness.com/chili-pepper-recipes/sauces/hot-pepper-relish/. I love this one. Or, try this Tomato Relish: https://www.chilipeppermadness.com/recipes/green-tomato-relish/. I hope this helps! Cheers!

      Reply
  6. Tina Wilcox says

    January 03, 2022 at 6:07 pm

    5 stars
    I have not made this yet, but will be making it this week! I have been looking for a Kimchi recipe! Thanks

    Reply
    • Michael Hultquist - Chili Pepper Madness says

      January 03, 2022 at 10:30 pm

      Enjoy, Tina. Such an enjoyable recipe. So many ways to use kimchi!

      Reply

Primary Sidebar

#kt-layout-id_f1efa3-1a > .kt-row-column-wrap{align-content:start;}:where(#kt-layout-id_f1efa3-1a > .kt-row-column-wrap) > .wp-block-kadence-column{justify-content:start;}#kt-layout-id_f1efa3-1a > .kt-row-column-wrap{column-gap:var(--global-kb-gap-md, 2rem);row-gap:var(--global-kb-gap-md, 2rem);padding-top:25px;padding-bottom:25px;padding-top:10px;padding-bottom:10px;padding-left:15px;padding-right:15px;grid-template-columns:minmax(0, 1fr);}#kt-layout-id_f1efa3-1a{background-color:#57585b;}#kt-layout-id_f1efa3-1a > .kt-row-layout-overlay{opacity:0.30;}#kt-layout-id_f1efa3-1a ,#kt-layout-id_f1efa3-1a h1,#kt-layout-id_f1efa3-1a h3,#kt-layout-id_f1efa3-1a h3,#kt-layout-id_f1efa3-1a h4,#kt-layout-id_f1efa3-1a h5,#kt-layout-id_f1efa3-1a h6{color:#ffffff;}#kt-layout-id_f1efa3-1a a{color:#ffffff;}#kt-layout-id_f1efa3-1a a:hover{color:#ffffff;}@media all and (max-width: 1024px){#kt-layout-id_f1efa3-1a > .kt-row-column-wrap{grid-template-columns:minmax(0, 1fr);}}@media all and (max-width: 767px){#kt-layout-id_f1efa3-1a > .kt-row-column-wrap{grid-template-columns:minmax(0, 1fr);}}
.kadence-column_b4030b-13 > .kt-inside-inner-col{border-top-width:0px;border-right-width:0px;border-bottom-width:0px;border-left-width:0px;}.kadence-column_b4030b-13 > .kt-inside-inner-col,.kadence-column_b4030b-13 > .kt-inside-inner-col:before{border-top-left-radius:0px;border-top-right-radius:0px;border-bottom-right-radius:0px;border-bottom-left-radius:0px;}.kadence-column_b4030b-13 > .kt-inside-inner-col:before{opacity:0.3;}.kadence-column_b4030b-13{position:relative;}

ALL. SPICY. RECIPES. Hi, I’m Mike and I LOVE Spicy Food! Say goodbye to bland and boring food with my easy-to-follow recipes. Let’s get cooking!

More about me →

#kt-layout-id_64ff15-6c > .kt-row-column-wrap{align-content:start;}:where(#kt-layout-id_64ff15-6c > .kt-row-column-wrap) > .wp-block-kadence-column{justify-content:start;}#kt-layout-id_64ff15-6c > .kt-row-column-wrap{column-gap:var(--global-kb-gap-md, 2rem);row-gap:var(--global-kb-gap-md, 2rem);padding-top:25px;padding-bottom:25px;padding-top:5px;padding-bottom:5px;grid-template-columns:minmax(0, 1fr);}#kt-layout-id_64ff15-6c > .kt-row-layout-overlay{opacity:0.30;}@media all and (max-width: 1024px){#kt-layout-id_64ff15-6c > .kt-row-column-wrap{grid-template-columns:minmax(0, 1fr);}}@media all and (max-width: 767px){#kt-layout-id_64ff15-6c > .kt-row-column-wrap{grid-template-columns:minmax(0, 1fr);}}
.kadence-column_1704f8-c7 > .kt-inside-inner-col{border-top-width:0px;border-right-width:0px;border-bottom-width:0px;border-left-width:0px;}.kadence-column_1704f8-c7 > .kt-inside-inner-col,.kadence-column_1704f8-c7 > .kt-inside-inner-col:before{border-top-left-radius:0px;border-top-right-radius:0px;border-bottom-right-radius:0px;border-bottom-left-radius:0px;}.kadence-column_1704f8-c7 > .kt-inside-inner-col:before{opacity:0.3;}.kadence-column_1704f8-c7{position:relative;}
.wp-block-kadence-advancedbtn.kt-btns_3b7d24-dd, .site .entry-content .wp-block-kadence-advancedbtn.kt-btns_3b7d24-dd, .wp-block-kadence-advancedbtn.kb-btns_3b7d24-dd, .site .entry-content .wp-block-kadence-advancedbtn.kb-btns_3b7d24-dd{margin-bottom:5px;}.wp-block-kadence-advancedbtn.kb-btns_3b7d24-dd{gap:var(--global-kb-gap-xs, 0.5rem );justify-content:center;align-items:center;}.kt-btns_3b7d24-dd .kt-button{font-weight:normal;font-style:normal;text-transform:capitalize;}.kt-btns_3b7d24-dd .kt-btn-wrap-0{margin-right:5px;}.wp-block-kadence-advancedbtn.kt-btns_3b7d24-dd .kt-btn-wrap-0 .kt-button{color:#ffffff;background:#ae1f24;border-color:#ae1f24;border-style:solid;}.wp-block-kadence-advancedbtn.kt-btns_3b7d24-dd .kt-btn-wrap-0 .kt-button:hover, .wp-block-kadence-advancedbtn.kt-btns_3b7d24-dd .kt-btn-wrap-0 .kt-button:focus{color:#ae1f24;border-color:#ae1f24;}.wp-block-kadence-advancedbtn.kt-btns_3b7d24-dd .kt-btn-wrap-0 .kt-button::before{display:none;}.wp-block-kadence-advancedbtn.kt-btns_3b7d24-dd .kt-btn-wrap-0 .kt-button:hover, .wp-block-kadence-advancedbtn.kt-btns_3b7d24-dd .kt-btn-wrap-0 .kt-button:focus{background:#ffffff;}.kt-btns_3b7d24-dd .kt-btn-wrap-1{margin-right:5px;}.wp-block-kadence-advancedbtn.kt-btns_3b7d24-dd .kt-btn-wrap-1 .kt-button{color:#ffffff;font-size:nonepx;background:#ae1f24;border-color:#ae1f24;border-style:solid;}.wp-block-kadence-advancedbtn.kt-btns_3b7d24-dd .kt-btn-wrap-1 .kt-button:hover, .wp-block-kadence-advancedbtn.kt-btns_3b7d24-dd .kt-btn-wrap-1 .kt-button:focus{color:#ae1f24;border-color:#ae1f24;}.wp-block-kadence-advancedbtn.kt-btns_3b7d24-dd .kt-btn-wrap-1 .kt-button::before{display:none;}.wp-block-kadence-advancedbtn.kt-btns_3b7d24-dd .kt-btn-wrap-1 .kt-button:hover, .wp-block-kadence-advancedbtn.kt-btns_3b7d24-dd .kt-btn-wrap-1 .kt-button:focus{background:#ffffff;}
Mexican
Cajun
.wp-block-kadence-advancedbtn.kt-btns_a4972e-b9, .site .entry-content .wp-block-kadence-advancedbtn.kt-btns_a4972e-b9, .wp-block-kadence-advancedbtn.kb-btns_a4972e-b9, .site .entry-content .wp-block-kadence-advancedbtn.kb-btns_a4972e-b9{margin-bottom:5px;}.wp-block-kadence-advancedbtn.kb-btns_a4972e-b9{gap:var(--global-kb-gap-xs, 0.5rem );justify-content:center;align-items:center;}.kt-btns_a4972e-b9 .kt-button{font-weight:normal;font-style:normal;text-transform:capitalize;}.kt-btns_a4972e-b9 .kt-btn-wrap-0{margin-right:5px;}.wp-block-kadence-advancedbtn.kt-btns_a4972e-b9 .kt-btn-wrap-0 .kt-button{color:#ffffff;font-size:nonepx;background:#ae1f24;border-color:#ae1f24;border-style:solid;}.wp-block-kadence-advancedbtn.kt-btns_a4972e-b9 .kt-btn-wrap-0 .kt-button:hover, .wp-block-kadence-advancedbtn.kt-btns_a4972e-b9 .kt-btn-wrap-0 .kt-button:focus{color:#ae1f24;border-color:#ae1f24;}.wp-block-kadence-advancedbtn.kt-btns_a4972e-b9 .kt-btn-wrap-0 .kt-button::before{display:none;}.wp-block-kadence-advancedbtn.kt-btns_a4972e-b9 .kt-btn-wrap-0 .kt-button:hover, .wp-block-kadence-advancedbtn.kt-btns_a4972e-b9 .kt-btn-wrap-0 .kt-button:focus{background:#ffffff;}.kt-btns_a4972e-b9 .kt-btn-wrap-1{margin-right:5px;}.wp-block-kadence-advancedbtn.kt-btns_a4972e-b9 .kt-btn-wrap-1 .kt-button{color:#ffffff;font-size:nonepx;background:#ae1f24;border-color:#ae1f24;border-style:solid;}.wp-block-kadence-advancedbtn.kt-btns_a4972e-b9 .kt-btn-wrap-1 .kt-button:hover, .wp-block-kadence-advancedbtn.kt-btns_a4972e-b9 .kt-btn-wrap-1 .kt-button:focus{color:#ae1f24;border-color:#ae1f24;}.wp-block-kadence-advancedbtn.kt-btns_a4972e-b9 .kt-btn-wrap-1 .kt-button::before{display:none;}.wp-block-kadence-advancedbtn.kt-btns_a4972e-b9 .kt-btn-wrap-1 .kt-button:hover, .wp-block-kadence-advancedbtn.kt-btns_a4972e-b9 .kt-btn-wrap-1 .kt-button:focus{background:#ffffff;}
Sauces
Seasonings
#kt-layout-id_c817fe-68 > .kt-row-column-wrap{align-content:start;}:where(#kt-layout-id_c817fe-68 > .kt-row-column-wrap) > .wp-block-kadence-column{justify-content:start;}#kt-layout-id_c817fe-68 > .kt-row-column-wrap{column-gap:var(--global-kb-gap-md, 2rem);row-gap:var(--global-kb-gap-md, 2rem);padding-top:25px;padding-bottom:25px;padding-left:15px;padding-right:15px;grid-template-columns:minmax(0, 1fr);}#kt-layout-id_c817fe-68{background-color:#57585b;}#kt-layout-id_c817fe-68 > .kt-row-layout-overlay{opacity:0.30;}#kt-layout-id_c817fe-68 ,#kt-layout-id_c817fe-68 h1,#kt-layout-id_c817fe-68 h3,#kt-layout-id_c817fe-68 h3,#kt-layout-id_c817fe-68 h4,#kt-layout-id_c817fe-68 h5,#kt-layout-id_c817fe-68 h6{color:#ffffff;}@media all and (max-width: 1024px){#kt-layout-id_c817fe-68 > .kt-row-column-wrap{grid-template-columns:minmax(0, 1fr);}}@media all and (max-width: 767px){#kt-layout-id_c817fe-68 > .kt-row-column-wrap{grid-template-columns:minmax(0, 1fr);}}
.kadence-column_3f2e79-28 > .kt-inside-inner-col{border-top-width:0px;border-right-width:0px;border-bottom-width:0px;border-left-width:0px;}.kadence-column_3f2e79-28 > .kt-inside-inner-col,.kadence-column_3f2e79-28 > .kt-inside-inner-col:before{border-top-left-radius:0px;border-top-right-radius:0px;border-bottom-right-radius:0px;border-bottom-left-radius:0px;}.kadence-column_3f2e79-28 > .kt-inside-inner-col:before{opacity:0.3;}.kadence-column_3f2e79-28{position:relative;}
.wp-block-kadence-advancedheading.kt-adv-heading_359b98-ed, .wp-block-kadence-advancedheading.kt-adv-heading_359b98-ed[data-kb-block="kb-adv-heading_359b98-ed"]{margin-top:0px;margin-bottom:0px;text-align:center;font-style:normal;}.wp-block-kadence-advancedheading.kt-adv-heading_359b98-ed mark, .wp-block-kadence-advancedheading.kt-adv-heading_359b98-ed[data-kb-block="kb-adv-heading_359b98-ed"] mark{font-style:normal;color:#f76a0c;padding-top:0px;padding-right:0px;padding-bottom:0px;padding-left:0px;}

5 ESSENTIALS FOR SPICY COOKING

.wp-block-kadence-advancedheading.kt-adv-heading_499202-20, .wp-block-kadence-advancedheading.kt-adv-heading_499202-20[data-kb-block="kb-adv-heading_499202-20"]{text-align:center;font-style:normal;}.wp-block-kadence-advancedheading.kt-adv-heading_499202-20 mark, .wp-block-kadence-advancedheading.kt-adv-heading_499202-20[data-kb-block="kb-adv-heading_499202-20"] mark{font-style:normal;color:#f76a0c;padding-top:0px;padding-right:0px;padding-bottom:0px;padding-left:0px;}

Subscribe and receive my FREE email series with tips for spicy cooking and new Recipes

#kt-layout-id_020f15-6d > .kt-row-column-wrap{align-content:start;}:where(#kt-layout-id_020f15-6d > .kt-row-column-wrap) > .wp-block-kadence-column{justify-content:start;}#kt-layout-id_020f15-6d > .kt-row-column-wrap{column-gap:var(--global-kb-gap-md, 2rem);row-gap:var(--global-kb-gap-md, 2rem);padding-top:25px;padding-bottom:25px;padding-top:5px;padding-bottom:5px;grid-template-columns:minmax(0, 1fr);}#kt-layout-id_020f15-6d > .kt-row-layout-overlay{opacity:0.30;}@media all and (max-width: 1024px){#kt-layout-id_020f15-6d > .kt-row-column-wrap{grid-template-columns:minmax(0, 1fr);}}@media all and (max-width: 767px){#kt-layout-id_020f15-6d > .kt-row-column-wrap{grid-template-columns:minmax(0, 1fr);}}#kt-layout-id_020f15-6d img { margin-bottom: 0px;}
.kadence-column_e21dd5-10 > .kt-inside-inner-col{border-top-width:0px;border-right-width:0px;border-bottom-width:0px;border-left-width:0px;}.kadence-column_e21dd5-10 > .kt-inside-inner-col,.kadence-column_e21dd5-10 > .kt-inside-inner-col:before{border-top-left-radius:0px;border-top-right-radius:0px;border-bottom-right-radius:0px;border-bottom-left-radius:0px;}.kadence-column_e21dd5-10 > .kt-inside-inner-col:before{opacity:0.3;}.kadence-column_e21dd5-10{position:relative;}
Order The Spicy Food Lovers' Cookbook by Mike Hultquist
.wp-block-kadence-advancedheading.kt-adv-heading_2c0928-441, .wp-block-kadence-advancedheading.kt-adv-heading_2c0928-441[data-kb-block="kb-adv-heading_2c0928-441"]{margin-top:0px;text-align:center;font-size:16px;font-style:normal;}.wp-block-kadence-advancedheading.kt-adv-heading_2c0928-441 mark, .wp-block-kadence-advancedheading.kt-adv-heading_2c0928-441[data-kb-block="kb-adv-heading_2c0928-441"] mark{font-style:normal;color:#f76a0c;padding-top:0px;padding-right:0px;padding-bottom:0px;padding-left:0px;}

AMAZON / BARNES & NOBLE / INDIEBOUND / BOOKS A MILLION

#kt-layout-id_ae75be-09 > .kt-row-column-wrap{align-content:start;}:where(#kt-layout-id_ae75be-09 > .kt-row-column-wrap) > .wp-block-kadence-column{justify-content:start;}#kt-layout-id_ae75be-09 > .kt-row-column-wrap{column-gap:var(--global-kb-gap-md, 2rem);row-gap:var(--global-kb-gap-md, 2rem);padding-top:25px;padding-bottom:25px;padding-top:5px;padding-bottom:5px;grid-template-columns:minmax(0, 1fr);}#kt-layout-id_ae75be-09 > .kt-row-layout-overlay{opacity:0.30;}@media all and (max-width: 1024px){#kt-layout-id_ae75be-09 > .kt-row-column-wrap{grid-template-columns:minmax(0, 1fr);}}@media all and (max-width: 767px){#kt-layout-id_ae75be-09 > .kt-row-column-wrap{grid-template-columns:minmax(0, 1fr);}}#kt-layout-id_ae75be-09 img { margin-bottom: 0px;}
.kadence-column_ee6fa5-e5 > .kt-inside-inner-col{border-top-width:0px;border-right-width:0px;border-bottom-width:0px;border-left-width:0px;}.kadence-column_ee6fa5-e5 > .kt-inside-inner-col,.kadence-column_ee6fa5-e5 > .kt-inside-inner-col:before{border-top-left-radius:0px;border-top-right-radius:0px;border-bottom-right-radius:0px;border-bottom-left-radius:0px;}.kadence-column_ee6fa5-e5 > .kt-inside-inner-col:before{opacity:0.3;}.kadence-column_ee6fa5-e5{position:relative;}
Order The Spicy Dehydrator Cookbook by Mike Hultquist
.wp-block-kadence-advancedheading.kt-adv-heading_35b1a9-ad, .wp-block-kadence-advancedheading.kt-adv-heading_35b1a9-ad[data-kb-block="kb-adv-heading_35b1a9-ad"]{margin-top:0px;text-align:center;font-size:16px;font-style:normal;}.wp-block-kadence-advancedheading.kt-adv-heading_35b1a9-ad mark, .wp-block-kadence-advancedheading.kt-adv-heading_35b1a9-ad[data-kb-block="kb-adv-heading_35b1a9-ad"] mark{font-style:normal;color:#f76a0c;padding-top:0px;padding-right:0px;padding-bottom:0px;padding-left:0px;}

AMAZON / BARNES & NOBLE / INDIEBOUND

#kt-layout-id_886631-20 > .kt-row-column-wrap{align-content:start;}:where(#kt-layout-id_886631-20 > .kt-row-column-wrap) > .wp-block-kadence-column{justify-content:start;}#kt-layout-id_886631-20 > .kt-row-column-wrap{column-gap:var(--global-kb-gap-md, 2rem);row-gap:var(--global-kb-gap-md, 2rem);padding-top:25px;padding-bottom:25px;padding-top:var(--global-kb-spacing-sm, 1.5rem);padding-bottom:var(--global-kb-spacing-sm, 1.5rem);grid-template-columns:minmax(0, 1fr);}#kt-layout-id_886631-20 > .kt-row-layout-overlay{opacity:0.30;}@media all and (max-width: 1024px){#kt-layout-id_886631-20 > .kt-row-column-wrap{grid-template-columns:minmax(0, 1fr);}}@media all and (max-width: 767px){#kt-layout-id_886631-20 > .kt-row-column-wrap{grid-template-columns:minmax(0, 1fr);}}
.kadence-column_975555-9f > .kt-inside-inner-col{border-top-width:0px;border-right-width:0px;border-bottom-width:0px;border-left-width:0px;}.kadence-column_975555-9f > .kt-inside-inner-col,.kadence-column_975555-9f > .kt-inside-inner-col:before{border-top-left-radius:0px;border-top-right-radius:0px;border-bottom-right-radius:0px;border-bottom-left-radius:0px;}.kadence-column_975555-9f > .kt-inside-inner-col:before{opacity:0.3;}.kadence-column_975555-9f{position:relative;}
.wp-block-kadence-advancedheading.kt-adv-heading_534668-ac, .wp-block-kadence-advancedheading.kt-adv-heading_534668-ac[data-kb-block="kb-adv-heading_534668-ac"]{text-align:center;font-style:normal;}.wp-block-kadence-advancedheading.kt-adv-heading_534668-ac mark, .wp-block-kadence-advancedheading.kt-adv-heading_534668-ac[data-kb-block="kb-adv-heading_534668-ac"] mark{font-style:normal;color:#f76a0c;padding-top:0px;padding-right:0px;padding-bottom:0px;padding-left:0px;}

Most Popular Recipes

  • Bang Bang Chicken Recipe
    Bang Bang Chicken
  • Mexican Birria Recipe
    Mexican Birria Recipe
  • Cajun Chicken and Sausage Gumbo Recipe
    Cajun Chicken and Sausage Gumbo Recipe
  • Jamaican Curry Chicken Recipe
    Jamaican Curry Chicken
  • Mexican Picadillo Recipe
    Mexican Picadillo Recipe
  • Homemade Blackening Seasoning Recipe
    Homemade Blackening Seasoning

Footer

NEVER MISS A RECIPE

Receive my "5 Essentials for Spicy Cooking" email series & new recipes

  • Facebook
  • Pinterest
  • Instagram
  • Twitter
  • YouTube

↑ back to top

About | Contact | Travel-Food | Ingredients | Stories | Privacy | Disclaimer | © 2023 Chili Pepper Madness

EXCLUSIVE MEMBER OF MEDIAVINE FOOD